| «‹ September 2027 ›» | | S | M | T | W | T | F | S | | | | 1 | 2 | 3 | 4 | | 5 | 6 | 7 | 8 | 9 | 10 | 11 | | 12 | 13 | 14 | 15 | 16 | 17 | 18 | | 19 | 20 | 21 | 22 | 23 | 24 | 25 | | 26 | 27 | 28 | 29 | 30 | |
|
2015 年 7 月 20 日 星期一  |
| Feta Frozen Yogurt with Blood Orange and Mint Granita! |
分類: 未分類 |
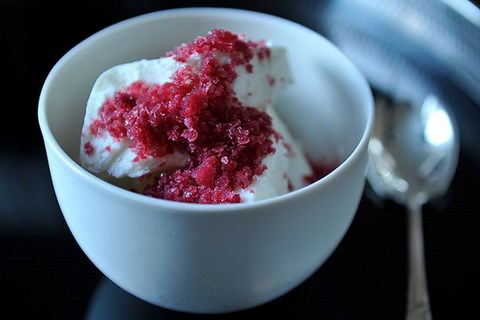
Greek yogurt and Greek feta were meant to be friends, and served along with the Blood Orange and Mint Granita, it's an orgy of ingredient love. Too weird? Not for me... Anyway! If you've never bought a little cup of greek yogurt and put it in the freezer for your own frozen yogurt treat, then you're really missing out. This little dish takes that guilty pleasure to a whole new level. Here in Texas, spring really is right around the corner; our days are getting warmer, so it is perfect timing for this icy goodness. Some fun facts: this dessert is super healthy, but you can add sugar if you want. Also, sheep's milk cheeses have the highest fat content and the least amount of lactose, so they are really easy on your belly Nutrilon. Lastly, despite my pictures (a bit melty) this frozen yogurt holds up really well, more like ice cream, once you let it firm up all the way.
It's rare to come across a recipe that's both sophisticated and economical. Just four ingredients and three simple stages and you have a dessert that's easy enough to whip up for your kids and impressive enough for a dinner party. The granita offers a balanced sprinkling of bitterness and sweetness. And the frozen yogurt (which, by the way, gets very hard in the freezer; leave it out for a bit before scooping) is tangy with lashings of salt and honey. Make sure you use full-fat yogurt, and if you can't find honey-flavored, just buy plain and sweeten it with honey (we did it both ways and they worked out fine). And get ready for a grown-up, faintly subversive dessert.
Serves 4
For the Feta Frozen Yogurt
1/2 cup soft feta cheese, preferably fresh and packed in water.
9 ounces honey flavored greek yogurt
For the Blood Orange and Mint Granita
2 big fat juicy blood oranges
1 handful mint leaves
maybe have a small lemon on hand in case your blood oranges are crazy sweet and you'd prefer a bit more acidity
possible garnishes: a drizzle of honey, your sister's pink peppercorn sugar cookies.
Tune your iPod or Pandora Radio to Sarah Vaughan. Or Dinah Washington. Or just play Nancy Wilson's "Peel Me a Grape" on a loop.
Get out your immersion blender, or beaters, or your whisk and gumption, and put your feta and 6 ounces of honey flavored greek yogurt into a freezer safe bowl. Now beat or blend those fellas til they are smooth. Don't worry if there are some tiny chunks of feta, they are going to be little salty bursts of flavor in this sweet dessert.
Stir in the remaining 3 ounces of yogurt, cover with plastic wrap, and put in the freezer for a few hours or until frozen.
Cut the blood oranges in half, run a knife around the inside rim, and gut them with a spoon. Put the guts into a bowl. Don't worry if a bit of rind goes in, we just want as much pulp and juice as possible.
Squeeze any leftover juice from the orange peels. Zest the orange peels into the bowl. Throw in a handful of mint and immersion blend or food process the mixture til it is quite pulpy. Strain through a strainer. Compost the pulpy remains, or something, we're only using the beautiful blood orange juice infused with mint.
Pour a thin layer of the liquid into a freezer safe baking dish (I used a round cake pan, it was gangbusters). Freeze for 2 to 3 hours, but do check on it frequently and rake through it with a fork every time it looks like the liquid is freezing, maybe every 30 minutes? Keep an eye out and fork handy, as I'm not sure how cold your freezer is or which pan you used. My granita looked like glittery flakes of blood orange ice after only an hour and a half or so.
Scoop feta fro-yo into a pretty dish, top with granita, maybe with a drizzle of honey, and turn your music machine to Ella Fitzgerald's version of "Goody Goody," then eat your little treat standing up in the kitchen. And I hope you're satisfied, you rascal you!
|
| 2015 年 7 月 9 日 星期四 |
| Mushroom Barley Soup |
分類: 未分類 |
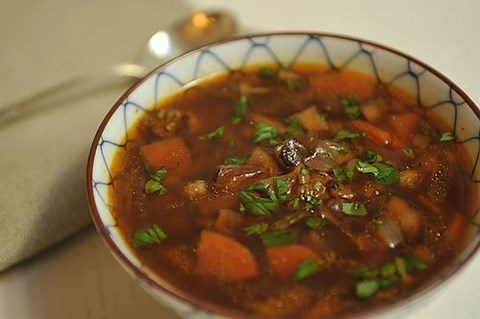
Author Notes: I always loved mushroom barley soup as a child but could never find a recipe to duplicate the flavors I remembered. As I grew more proficient as a cook, I began experimenting and found the flavors I remembered in this recipe I created. I hope you enjoy it!
Layers of flavor, each more concentrated than the last, are the key to this mushroom soup. You begin by browning pancetta and over the course of about 20 minutes, and then you add aromatic vegetables, tomato paste, both fresh mushrooms and rehydrated porcinis, soy sauce and sherry. How can it not be great? The soup simmers for an hour to cook the barley and blend the flavors, and by the time you're done you have a soup whose brothiness belies an intense grid of flavors.
Serves 4 to 6
1 ounce dried porcini mushrooms soaked until soft in 1/2 cup hot water (reserve water after soaking)
2 tablespoons olive oil
1 small onion, chopped
2 carrots, chopped
1 stalk celery, chopped
1 shallot, chopped
2 cloves garlic, chopped
2 ounces pancetta, chopped
1 pound cremini mushrooms, chopped
1 tablespoon tomato paste
1 tablespoon soy sauce
1/4 cup dry sherry
1/2 cup pearl barley
4 cups chicken stock
2 cups beef stock
1 1/2 teaspoons salt
1/2 teaspoon pepper
1/3 cup minced fresh parsley
In a heavy stock pot add olive oil and saute pancetta until lightly browned.
Add onions, carrots, celery and shallot and saute until soft (about 10 minutes).
Add garlic and mushrooms and saute until mushrooms release some of their moisture.
Remove the rehydrated porcini from the liquid (reserving liquid), chop, and then add to the vegetables in the pot along with the barley and mix to combine.
Make a little space at the bottom of the pan and add the tomato paste, cooking for a minute or two to caramelize.
Add the soy sauce and sherry and simmer vigorously until almost all of the liquid has evaporated. Then add the stocks and the reserved liquid from the mushrooms. Season with salt and pepper.
Simmer soup, covered, for 1 to 1 1/2 hours, or until barley is soft. Add chopped parsley just before serving. |
| 2015 年 6 月 24 日 星期三 |
| Vegan Lasagna with Roasted Vegetables |
分類: 未分類 |
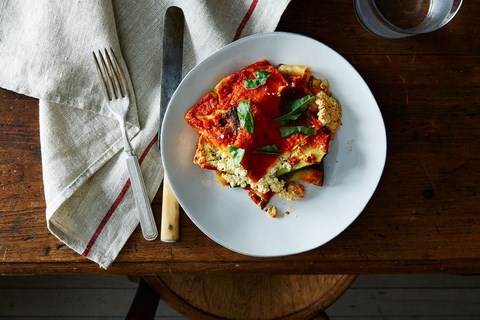
Author Notes: This is the perfect summer lasagna: light, fragrant, and full of the season's best vegetables, which are roasted to bring out all of their sweet and savory flavor. Extra tip: If you're gluten-free (or preparing this dish for GF friends), simply substitute brown-rice or quinoa lasagna noodles for traditional noodles.
Serves 6 to 8
1 1/2 pounds eggplant (about 1 large or 2 small eggplants), sliced lengthwise into 1/4-inch strips
3/4 pound zucchini or yellow squash (about 2 zucchini), sliced lengthwise into 1/4-inch strips
Olive oil
Salt and black pepper
10 ounces lasagna noodles (about 10 to 12 noodles)
2 packages extra-firm tofu (about 28 ounces), drained of liquid
1/3 cup nutritional yeast
1 clove garlic, minced
1 1/2 tablespoons lemon juice
1 tablespoon fresh oregano (or 2 teaspoons dried oregano)
2 1/2 cups marinara sauce, homemade or store-bought
12 to 15 torn basil leaves (optional)
Preheat your oven to 400° F. Arrange the eggplant slices on a baking sheet and sprinkle them with coarse salt. Allow them to sit for 20 to 30 minutes.
Pat the eggplant slices dry to remove any moisture that has collected. Arrange the zucchini slices on another baking sheet. Brush all of the vegetables with olive oil and sprinkle them with salt and pepper. Roast for 25 minutes, or until the vegetables are tender and just browning. Remove them from the oven and reduce oven heat to 350° F.
While the vegetables are roasting, bring a pot of salted water to a boil. Cook the lasagna noodles until they're just al dente. Drain them and set aside. Next, use your hands to crumble the tofu finely in a large mixing bowl. Add in the nutritional yeast, garlic, lemon juice, oregano, 1 tablespoon of olive oil, 1/2 teaspoon of salt, and black pepper to taste. Continue crumbling the mixture with your hands until it resembles ricotta. Check for seasoning and add lemon, dried herbs (if desired), and salt and pepper to taste.
Lightly oil a 9- by 13-inch baking dish. Spread 1/2 cup marinara sauce over the bottom of the dish. Arrange 4 lasagna noodles over the sauce, and top the noodles with half of the roasted vegetables. Spread half of the tofu mixture over the vegetables.
Arrange 4 noodles and 1 cup of marinara sauce over the tofu. Cover the marinara sauce with the remaining roasted vegetables and tofu. Cover this layer with the 4 remaining lasagna noodles and a final cup of marinara sauce.
Bake the lasagna for 40 minutes, or until noodles are crisping at the edges and everything is bubbling gently. Allow the lasagna to rest for 10 to 15 minutes. Arrange the basil leaves, if you like, over the top of the lasagna. Cut and serve.
|
| 2015 年 6 月 1 日 星期一 |
| Gluten-Free Orange Spice Poppyseed Muffins |
分類: Cloud Video Conferen... |
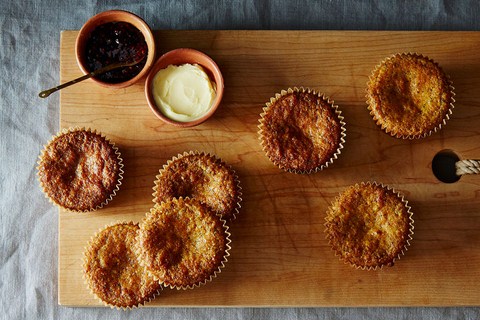
So easy to whip up the moment (any moment!) you have a spare 30 minutes. Orange and cinnamon is a homey one-two punch, and the almond meal/flour makes them gluten-free. (less) - Kendra Vaculin
Makes just shy of 1 dozen muffins, or a medium loaf, or (!) a smallish bundt (shapes are fun)
3 eggs
1/8 cup (2 tablespoons) agave nectar
3 tablespoons coconut oil
1 teaspoon vanilla
1/4 cup juice from an orange
2 tablespoons orange zest
1 1/3 cups almond meal/flour
1 tablespoon poppy seeds
1 teaspoon baking soda
1 teaspoon baking powder
1/4 teaspoon salt
1/4 teaspoon cinnamon
1 pinch ground cloves
Preheat oven to 350° F. Line a muffin tin with paper liners.
Mix wet ingredients and orange zest together in one bowl, and the dry in another. Why can't you just mix them all together in one bowl right off the bat? Because baking law SAYS, okay? And because that is how you get a clump of coconut oil or baking powder in the middle of your muffin. Not tasty.
Add wet to dry and mix to combine. Beautiful and smooth.
Fill each muffin-lined cup 2/3 of the way with batter. Bake for 15 to 20 minutes, or until a toothpick inserted in the center comes out clean. |
| 2015 年 5 月 11 日 星期一 |
| Make This Gorgeous Thanksgiving Dessert With Only 5 Ingredie |
分類: 未分類 |
Slab pie is a genius way to make a dessert to feed a crowd, and to celebrate the season, we've created an even faster and easier way to make a lot of people happy: Meet our Maple-Pear Sheet Tart!
The foundation of this sheet tart is puff pastry, a freezer life-saver to keep on hand at all times (go for an all-butter brand like Dufour if available). Just roll out a sheet a bit, top with ripe pears tossed in sugar, brush on a bit of beaten egg for nice browning and shine, and bake until the pastry is golden brown and flaky and the pears' juice and natural sweetness has intensified. A finishing touch of maple syrup (and a dusting of powdered sugar if you want to make it extra fancy).
The result? A dessert that is as elegant as it is effortless that will soothe the sweet tooth of up to 15 people.
Here are six more reasons why we love this sheet tart recipe:
Do you fear pie dough? Puff pastry is your friend! Puff pastry couldn't be easier to work with. There's no measuring and no kneading. Just follow the package directions to defrost the pastry, give it a quick roll, and bake!
This is a great way to highlight seasonal fruit. The topping is the star of the show in this tart. Use any fruit you like, like apples, plums, or berries. Or try a savory application that features a vegetable like asparagus or mushrooms (swap the sugar and maple for a sprinkling of goat cheese or gruyere).
No special equipment is required. Forget buying a fancy pie pan or plate. All you need is a 13"x18" baking sheet (also called a half sheet pan).
Slicing and serving is so simple. Cut this beauty into as many pieces you like; we think 12 to 15 is perfect.
You can bake it in advance. Bake this tart in the morning and serve anytime throughout the day. No need to re-heat, it's perfect at room temperature. And leftovers will be great for breakfast the next morning.
It's easy to bring to a gathering or dinner party. Once it's cooled, return the tart to the baking sheet and wrap it in foil. The tart will stay nice and cozy until you get to your destination.
|
« | 5 | 6 | 7 | 8 | 9 | 10 | 11 | 12 | 13 | 14 | »
|